导言:
本教程的Data Access Layer (DAL)使用的是类型化的数据集(Typed DataSets).就像我们在第一章《创建一个数据访问层》里探讨的一样,该类型化的数据集由强类型的DataTable和TableAdapter构成。DataTable描绘的是系统里的逻辑实体而TableAdapter引用相关数据库执行数据访问,包括对DataTable填充数据、执行返回标量数据(scalar data)的请求、添加,更新,删除数据库里的记录等.
TableAdapter执行的SQL命令要么是某个特定的SQL statements,比如SELECT columnList FROM TableName;要么是存储过程.本教程前面部分的TableAdapter使用的是SQL statements.不过很多开发者和数据库管理员基于安全、便于维护等方面的考虑,偏爱使用存储过程;不过也有的人出于灵活性的考虑偏爱使用SQL statement.就我自己而言,我也偏向于存储过程.在前面的文章,出于简化的目的我选用的是SQL statements.
当定义一个新TableAdapter或添加新方法时,使用TableAdapter的设置向导,我们可以很容易的创建新的或使用现有的存储过程.在本文,我们将考察如何使用设置向导自动的生产存储过程。在下一章我们考察如何设置TableAdapter的方法使用现有的或手动创建存储过程.
注意:关于讨论到底使用存储过程还是使用SQL statements的问题,可参考Rob Howard的博客文章《Don't Use Stored Procedures Yet?》(http://weblogs.asp.net/rhoward/archive/2003/11/17/38095.aspx)和Frans Bouma的博客文章《Stored Procedures are Bad, M'Kay?》(http://weblogs.asp.net/fboue/2003/11/18/38178.aspx)
存储过程基础
一个存储过程由一系列的T-SQL statement组成,当调用该存储过程时就执行这些T-SQL statement.存储过程可以接受0到多个输入参数,返回标量值、输出参数,或最常见的返回SELECT查询值.
注意:存储过程Stored procedures也经常引用为“sprocs” or “SPs”.
可以使用T-SQL statement语句CREATE PROCEDURE来创建存储过程.比如下面的T-SQL脚本创建了一个名为GetProductsByCategoryID的存储过程,它有一个名为 @CategoryID的参数,并且将表Products里与CategoryID值相吻合的那条记录的ProductID, ProductName, UnitPrice,以及Discontinued值返回.
CREATE PROCEDURE GetProductsByCategoryID
(
 @CategoryID int
)
AS

SELECT ProductID, ProductName, UnitPrice, Discontinued
FROM Products
WHERE CategoryID = @CategoryID
创建后,我们可以用下面的代码调用它:
EXEC GetProductsByCategory categoryID
注意:在下篇文章我们将在Visual Studio IDE集成环境里创建存储过程.不过在本文,我们将用TableAdapter向导来自动创建存储过程.
除了返回数据外,我们还可以在一个事务里用存储过程执行多条数据库命令.比如,假如有一个名为DeleteCategory的存储过程,其包含一个输入参数@CategoryID,并执行2个DELETE statemets,第一个是删除相关的products,第二个是删除category。存储过程里面的多个statements并不是自动的封装在一个事务里的.我们应添加额外的T-SQL commands以确保存储过程里的多条数据库命令当成原子操作处理.我们将在后面的内容考察如何用事务来封装存储过程的命令.
当在体系的某个层使用存储过程时,Data Access Layer的方法将调用某个具体的存储过程而不是发出一个SQL statement命令.这样一来我们可以发现、分析发出的查询命令.并可以更清楚的看到数据库是如何使用的.有关存储过程基本原理的更多信息,可参考本文结束部分的延伸阅读.
第一步:创建数据访问层高级场景的Web页面
在开始之前,让我们花点时间创建本文及后面几篇文章要用到的页面。新建一个名为AdvancedDAL的文件夹,然后添加如下的ASP.NET页面,记得使用母版页Site.master:
Default.aspx
NewSprocs.aspx
ExistingSprocs.aspx
JOINs.aspx
AddingColumns.aspx
ComputedColumns.aspx
EncryptingConfigSections.aspx
ManagedFunctionsAndSprocs.aspx
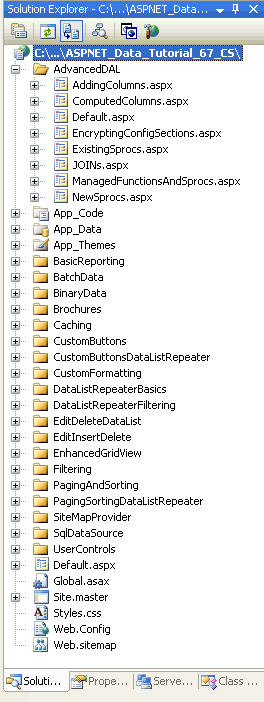
图1:添加相关的页面
像其它文件夹一样,Default.aspx页面将列出本部分的内容,记得SectionLevelTutorialListing.ascx用户控件提供了该功能。因此,将其从解决资源管理器里拖放到Default.aspx页面.
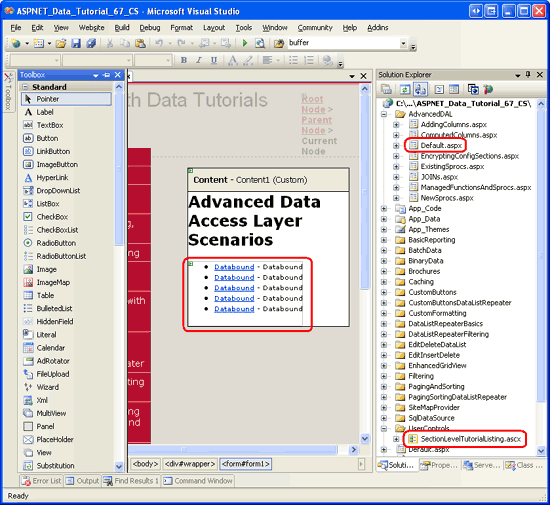
图2:将SectionLevelTutorialListing.ascx用户控件拖到Default.aspx页面
最后,将这些页面添加到Web.sitemap文件里。特别的,把下面的代码放在“Working with Batched Data”
siteMapNode>标签后面:
siteMapNode url="~/AdvancedDAL/Default.aspx"
 title="Advanced DAL Scenarios"
 description="Explore a number of advanced Data Access Layer scenarios.">

 siteMapNode url="~/AdvancedDAL/NewSprocs.aspx"
 title="Creating New Stored Procedures for TableAdapters"
 description="Learn how to have the TableAdapter wizard automatically
 create and use stored procedures." />
 siteMapNode url="~/AdvancedDAL/ExistingSprocs.aspx"
 title="Using Existing Stored Procedures for TableAdapters"
 description="See how to plug existing stored procedures into a
 TableAdapter." />
 siteMapNode url="~/AdvancedDAL/JOINs.aspx"
 title="Returning Data Using JOINs"
 description="Learn how to augment your DataTables to work with data
 returned from multiple tables via a JOIN query." />
 siteMapNode url="~/AdvancedDAL/AddingColumns.aspx"
 title="Adding DataColumns to a DataTable"
 description="Master adding new columns to an existing DataTable." />
 siteMapNode url="~/AdvancedDAL/ComputedColumns.aspx"
 title="Working with Computed Columns"
 description="Explore how to work with computed columns when using
 Typed DataSets." />
 siteMapNode url="~/AdvancedDAL/EncryptingConfigSections.aspx"
 title="Protected Connection Strings in Web.config"
 description="Protect your connection string information in
 Web.config using encryption." />
 siteMapNode url="~/AdvancedDAL/ManagedFunctionsAndSprocs.aspx"
 title="Creating Managed SQL Functions and Stored Procedures"
 description="See how to create SQL functions and stored procedures
 using managed code." />
/siteMapNode>
更新Web.sitemap文件后,花点时间在浏览器里查看,左边的菜单将包括本部分的内容.
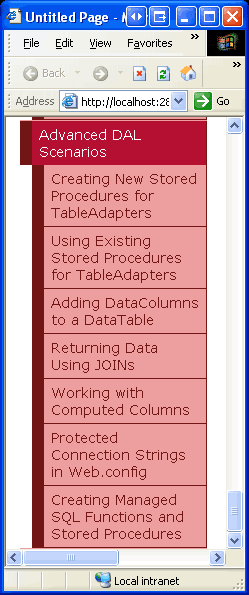
图3:网站地图现在包含了不部分的页面
第二步:设置TableAdapter创建新的存储过程
我们在~/App_Code/DAL文件夹里创建一个类型化的DataSet,名称为NorthwindWithSprocs.xsd.由于我们在以前的教程里已经详细探讨了创建细节,因此我们这里一笔带过,如果你想知道详细的创建过程请参阅前面的第1章《创建一个数据访问层》在DAL文件夹上右击鼠标选“添加新项”,选DataSet模板,如图4所示.
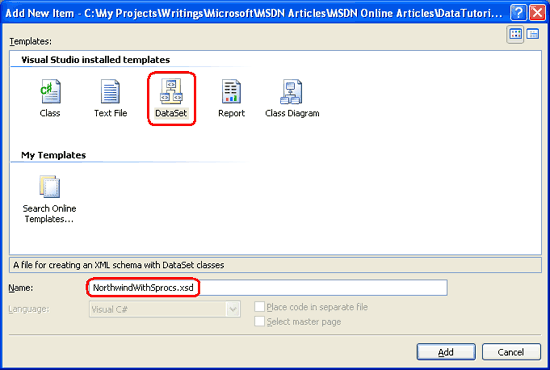
图4:新建一个名为NorthwindWithSprocs.xsd的数据集
这样将会创建一个新的类型化的DataSet,打开设计器,创建一个新的TableAdapter,展开TableAdapter设置向导.向导的第一步是让我们选择要连接的数据库.在下拉列表里有一个连接到Northwind数据库的连接字符串,选中它,再点下一步。接下来的界面让我们选择TableAdapter以哪种方式访问数据库.在以前的教程里我们选择的是“Use SQL statements”,不过在本文我们选第二项:“Create new stored procedures”,点下一步.
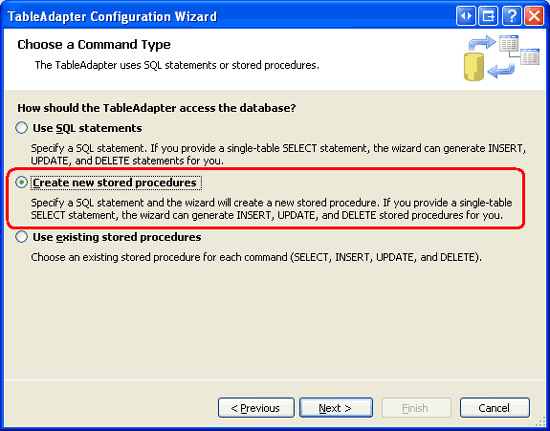
图5:设置TableAdpater创建新的存储过程
接下来,我们要指定主查询(main query).我们将创建一个存储过程来包含SELECT查询.
使用下面的SELECT查询:
SELECT ProductID, ProductName, SupplierID, CategoryID,
 QuantityPerUnit, UnitPrice, UnitsInStock, UnitsOnOrder,
 ReorderLevel, Discontinued
FROM Products
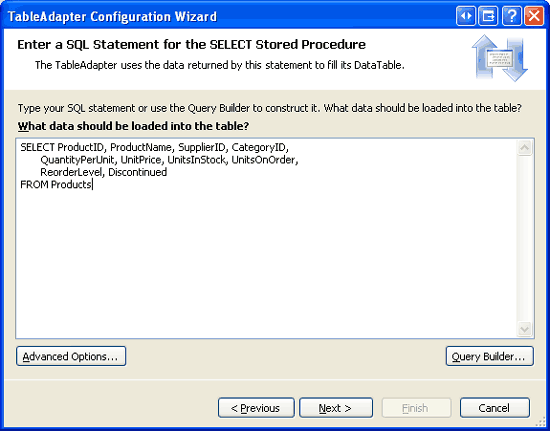
图6:键入SELECT查询
注意:在名为Northwind的数据集里的ProductsTableAdapter的主查询与上面本文定义的主查询有所不同。那个主查询还返回了每个产品的category名称和company名称.不过在后面的文章我们将对本文的TableAdapter添加这些相关的代码.再点“Advanced Options”按钮.我们可以指定是否让向导为TableAdapter自动生成insert, update和delete statements;是否使用开发式并发操作(optimistic concurrency);是否完成inserts 和 update操作后刷新数据表.在默认情况下,自动选中“Generate Insert, Update and Delete statements”选项。另外,本文不用选择“Use optimistic concurrency”项.当选择自动创建存储过程时,“Refresh the data table”项将被忽略掉.不管是否选中该项,最终的insert 和update存储过程都会检索刚添加或刚更新(just-inserted or just-updated record)的记录,我们将在第三步看到.
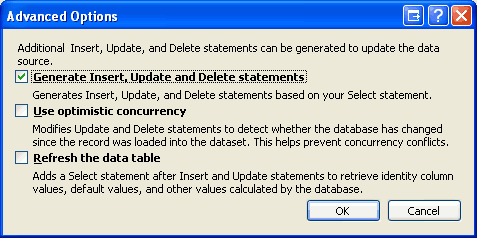
图7:选中“Generate Insert, Update and Delete statements”项
注意:当选中“Use optimistic concurrency”项的时候,向导会在WHERE语句里添加额外的条件,当其它列的值发生改动的话,将阻止数据更新.关于使用TableAdapter内置的optimistic concurrency功能请参阅第21章《实现开放式并发》输入SELECT主查询并选取“Generate Insert, Update and Delete statements”项后,点下一步,接下来的界面,如图8所示,让我们为selecting, inserting, updating, 和deleting数据的存储过程命名.将这些存储过程的名字改为Products_Select, Products_Insert, Products_Update, 和Products_Delete.
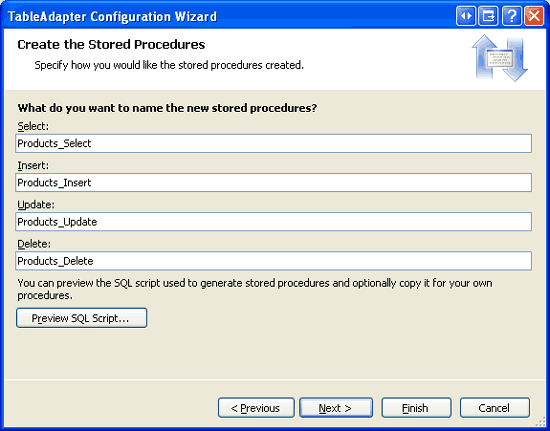
图8:为存储过程重命名
向导创建了4个存储过程,点“Preview SQL Script”按钮,你可以在Preview SQL Script 对话框里将脚本保存在一个文件里或复制到剪贴板.
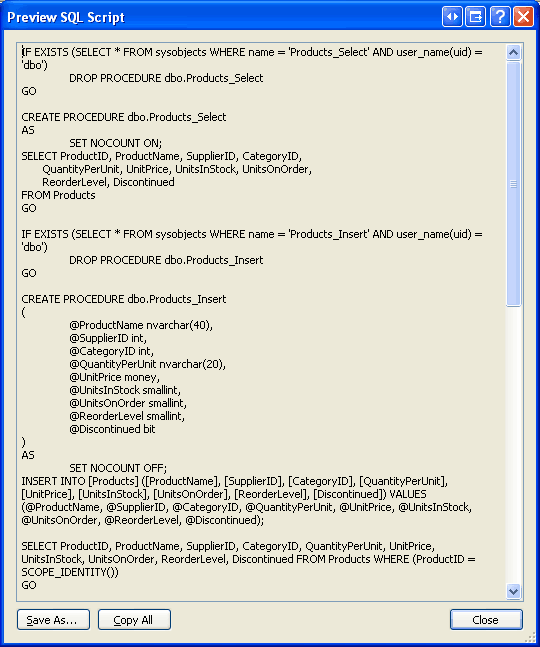
图9:预览生成的存储过程
对存储过程重命名后,点下一步,对TableAdapter相应的方法命名.就像使用SQL statements一样,我们可以创建方法来填充一个现有的DataTable或返回一个新的DataTable;我们也一个指定TableAdapter是否采用DB-Direct模式来插入、更新、删除记录.全选这3项,只不过将Return a DataTable方法重命名为GetProducts,如图10所示:
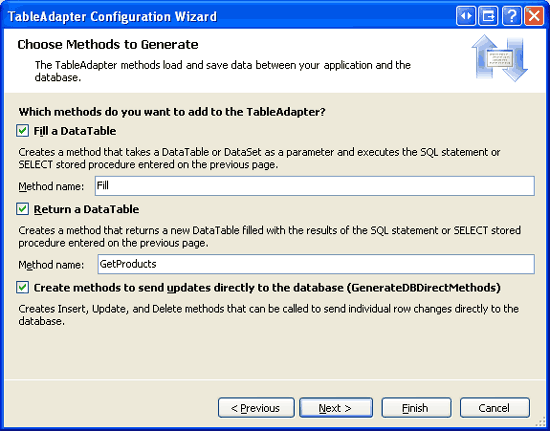
图10:将方法重命名为Fill 和GetProducts
点Next总览向导将执行的步骤.点Finish按钮完成设置.一旦向导结束后,将返回DataSet设计器,它此时将包括ProductsDataTable.
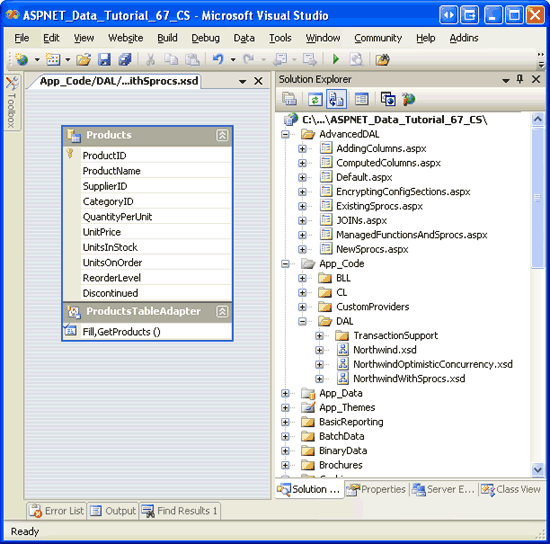
图11:DataSet设计器将显示刚刚添加的ProductsDataTable
第三步:考察刚刚创建的存储过程
我们在第二步里用向导创建了选择、插入、更新、删除数据的存储过程.这些存储过程可以通过Visual Studio查看或修改.打开服务器资源管理器,点到数据库的存储过程文件夹。如图12所示,Northwind数据库包含了4个新的存储过程,Products_Delete, Products_Insert, Products_Select, and Products_Update.
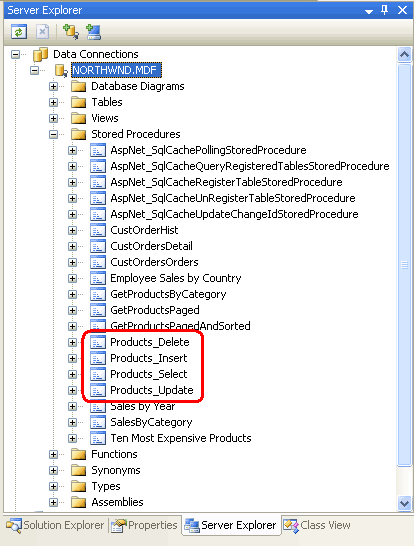
图12:可以在Stored Procedures文件夹里找到我们创建的4个存储过程
注意:如果你看不到服务器资源管理器,点“View”菜单,选Server Explorer项.如果你无法找到新创建的存储过程,右击Stored Procedures文件夹,选“刷新”.
要查看或修改某个存储过程,在服务器资源管理器里双击其名字或右击该存储过程,选”打开“。如13显示的是打开Products_Delete存储过程的画面.
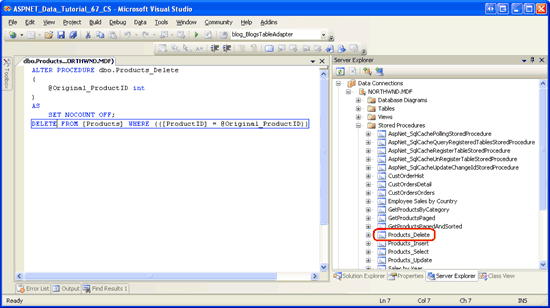
图13:可以在Visual Studio里打开并修改存储过程
Products_Delete和Products_Select存储过程的内容很好理解。比如下面的代码构成了Products_Insert存储过程.
ALTER PROCEDURE dbo.Products_Insert
(
 @ProductName nvarchar(40),
 @SupplierID int,
 @CategoryID int,
 @QuantityPerUnit nvarchar(20),
 @UnitPrice money,
 @UnitsInStock smallint,
 @UnitsOnOrder smallint,
 @ReorderLevel smallint,
 @Discontinued bit
)
AS
 SET NOCOUNT OFF;
INSERT INTO [Products] ([ProductName], [SupplierID], [CategoryID], [QuantityPerUnit],
 [UnitPrice], [UnitsInStock], [UnitsOnOrder], [ReorderLevel], [Discontinued])
VALUES (@ProductName, @SupplierID, @CategoryID, @QuantityPerUnit, @UnitPrice,
 @UnitsInStock, @UnitsOnOrder, @ReorderLevel, @Discontinued);

SELECT ProductID, ProductName, SupplierID, CategoryID, QuantityPerUnit, UnitPrice,
 UnitsInStock, UnitsOnOrder, ReorderLevel, Discontinued
FROM Products
WHERE (ProductID = SCOPE_IDENTITY())
在TableAdapter向导里定义的SELECT查询返回Products表里的列,这些列又作为存储过程的输入参数并运用到INSERT statement中.紧接着的是一个SELECT查询,返回Products表里最新添加的记录的各列的值(包括ProductID)。当使用Batch Update模式添加一个新记录时,刷新功能是很有用的。因为它将最新添加的ProductRow instances实例的ProductID属性赋值为数据库指派的自增值.
下面的代码说明了该功能.代码创建了基于NorthwindWithSprocs数据集的ProductsTableAdapter以及ProductsDataTable。要向数据库添加一个新的产品,我们要创建一个ProductsRow instance实例,对其赋值,并调用TableAdapter的Update方法,再传递给ProductsDataTable.在内部,TableAdapter的Update方法遍历传递给DataTable的所有ProductsRow instance实例(在本例,只有一个。因为我们只添加了一个产品),并执行相应的insert, update, 或delete命令。此时,执行Products_Insert存储过程,其向Products表添加一条新记录,并返回该记录的详细信息,然后更新ProductsRow instance实例的ProductID值。Update方法完成后,我们就可以通过ProductsRow的ProductID属性访问新添加记录的ProductID值了.
// Create the ProductsTableAdapter and ProductsDataTable
NorthwindWithSprocsTableAdapters.ProductsTableAdapter productsAPI =
 new NorthwindWithSprocsTableAdapters.ProductsTableAdapter();
NorthwindWithSprocs.ProductsDataTable products =
 new NorthwindWithSprocs.ProductsDataTable();

// Create a new ProductsRow instance and set its properties
NorthwindWithSprocs.ProductsRow product = products.NewProductsRow();
product.ProductName = "New Product";
product.CategoryID = 1; // Beverages
product.Discontinued = false;

// Add the ProductsRow instance to the DataTable
products.AddProductsRow(product);

// Update the DataTable using the Batch Update pattern
productsAPI.Update(products);

// At this point, we can determine the value of the newly-added record's ProductID
int newlyAddedProductIDValue = product.ProductID;
类似的,Products_Update存储过程的UPDATE statement后面也包含一个SELECT statement,如下:
ALTER PROCEDURE dbo.Products_Update
(
 @ProductName nvarchar(40),
 @SupplierID int,
 @CategoryID int,
 @QuantityPerUnit nvarchar(20),
 @UnitPrice money,
 @UnitsInStock smallint,
 @UnitsOnOrder smallint,
 @ReorderLevel smallint,
 @Discontinued bit,
 @Original_ProductID int,
 @ProductID int
)
AS
 SET NOCOUNT OFF;
UPDATE [Products]
SET [ProductName] = @ProductName, [SupplierID] = @SupplierID,
 [CategoryID] = @CategoryID, [QuantityPerUnit] = @QuantityPerUnit,
 [UnitPrice] = @UnitPrice, [UnitsInStock] = @UnitsInStock,
 [UnitsOnOrder] = @UnitsOnOrder, [ReorderLevel] = @ReorderLevel,
 [Discontinued] = @Discontinued
WHERE (([ProductID] = @Original_ProductID));

SELECT ProductID, ProductName, SupplierID, CategoryID, QuantityPerUnit,
 UnitPrice, UnitsInStock, UnitsOnOrder, ReorderLevel, Discontinued
FROM Products
WHERE (ProductID = @ProductID)
我们注意到该存储过程有2个关于ProductID的参数,即@Original_ProductID 和@ProductID,这样以来我们就可以对主键值进行改动了.举个例子:有一个employee(雇员)数据库,每条employee记录都用雇员的社保号码作为其主键值.要想更改某条记录的社保号码,必须提供新的号码以及原始号码.不过对Products表来说用不着,因为列ProductID是一个唯一标识列(IDENTITY column),不应对其更改.实际上,Products_Update存储过程里的UPDATE statement并没有包含ProductID列,因此,如果在UPDATE statement的WHERE字句里使用@Original_ProductID的话,显得多此一举,而应该使用@ProductID参数.当更新某个存储过程的参数时,TableAdapter里所有那些调用该存储过程方法都应该进行更新.
第四步:修改存储过程的参数并更新TableAdapter
由于@Original_ProductID参数是多余的,让我们将其从Products_Update存储过程里完全清除.打开Products_Update存储过程,删除@Original_ProductID参数,在UPDATE statement的WHERE字句里将@Original_ProductID改为@ProductID. 完成上述修改后,该存储过程里的T-SQL看起来应该和下面的差不多:
ALTER PROCEDURE dbo.Products_Update
(
 @ProductName nvarchar(40),
 @SupplierID int,
 @CategoryID int,
 @QuantityPerUnit nvarchar(20),
 @UnitPrice money,
 @UnitsInStock smallint,
 @UnitsOnOrder smallint,
 @ReorderLevel smallint,
 @Discontinued bit,
 @ProductID int
)
AS
 SET NOCOUNT OFF;
UPDATE [Products] SET [ProductName] = @ProductName, [SupplierID] = @SupplierID,
 [CategoryID] = @CategoryID, [QuantityPerUnit] = @QuantityPerUnit,
 [UnitPrice] = @UnitPrice, [UnitsInStock] = @UnitsInStock,
 [UnitsOnOrder] = @UnitsOnOrder, [ReorderLevel] = @ReorderLevel,
 [Discontinued] = @Discontinued
WHERE (([ProductID] = @ProductID));

SELECT ProductID, ProductName, SupplierID, CategoryID, QuantityPerUnit,
 UnitPrice, UnitsInStock, UnitsOnOrder, ReorderLevel, Discontinued
FROM Products
WHERE (ProductID = @ProductID)
按Ctrl+S或点工具栏里的“保存”图标,保存更改.此时,Products_Update存储过程不会执行@Original_ProductID参数,但TableAdapter仍然会传递该参数.要想查看TableAdapter传递给Products_Update存储过程的参数,你可以在设计器里选中TableAdapter,转到属性窗口,点更新命令的参数集(UpdateCommand'sParameters collection)里的椭圆型区域,这样将转到Parameters Collection Editor对话框,如图14所示:
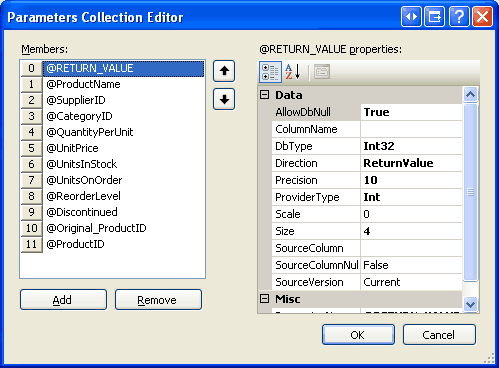
图14:对话框里列出了传递给Products_Update存储过程的参数
要删除参数,只需选中它,再点Remove按钮.
要刷新参数的话,你也可以在设计器里选中TableAdapter,点右键选“设置”,这将会开启TableAdapter设置向导,它列出了用于select, insert, updat和delete的存储过程,并列出了这些存储过程的输入参数.如果你在Update下拉列表里选Products_Update的话,你可以看到该存储过程包含的输入参数里已经没有包含@Original_ProductID了(见图15),点Finish将对TableAdapter使用的参数集自动更新.
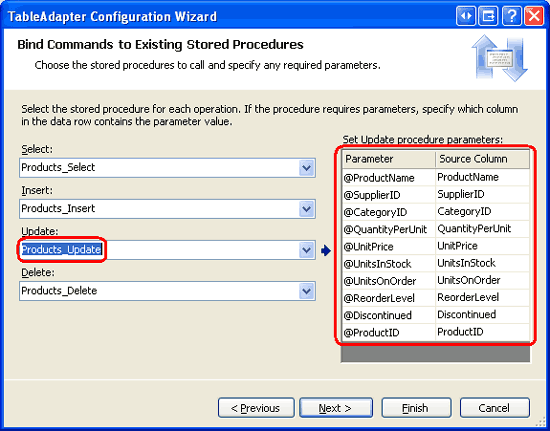
图15:你可以通过使用TableAdapter的设置向导来刷新参数集
第五步:添加额外的TableAdapter方法
我们在第二步说过,当创建一个新的TableAdapter时,很容易自动地生成相应的存储过程,同样我们也可以向TableAdapter添加额外的方法.作为演示,让我们向ProductsTableAdapter添加一个方法GetProductByProductID(productID),该方法将一个ProductID作为输入参数,并返回该产品的详细信息.在ProductsTableAdapter上点击右键,选择“添加查询”.
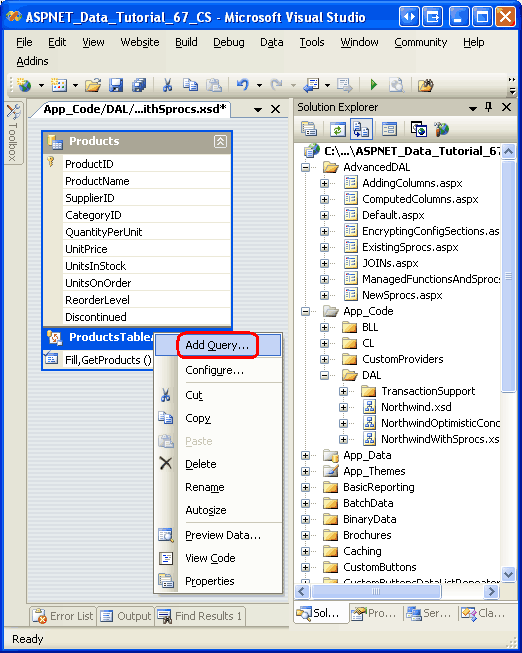
图16:向TableAdapter添加新查询
这将开启TableAdapter查询设置向导。首先,向导将询问以何种方式访问数据库,我们将创建一个新的存储过程,因此选“Create a new stored procedure”,再点Next.
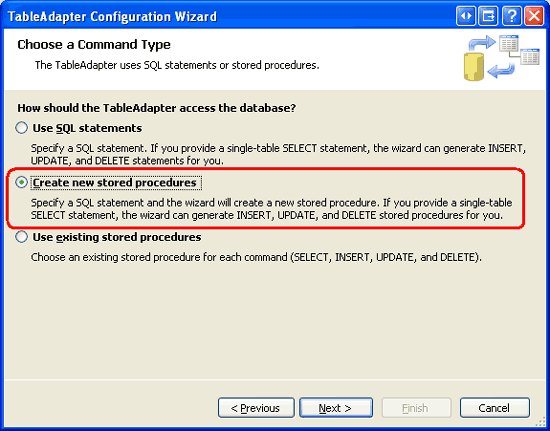
图17:选中“Create a new stored procedure”项
接下来,向导询问我们执行哪种查询,是返回一系列行?一个标量值?又或者执行UPDATE, INSERT,或 DELETE statement.由于GetProductByProductID(productID)方法将返回一行,我们选择“SELECT which returns row”项,再点Next.
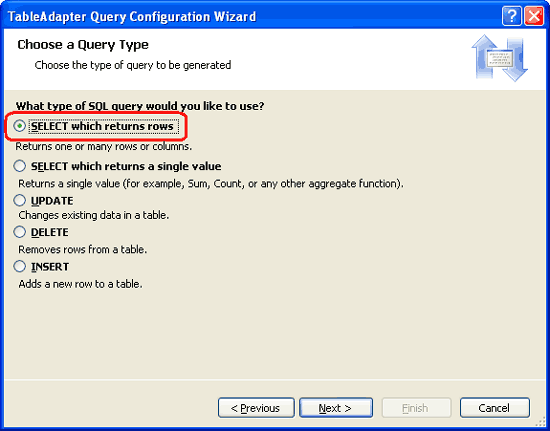
图18:选择“SELECT which returns row” 项
接下来的界面将展示TableAdapter的主查询,其仅仅列出了存储过程的名字(也就是dbo.Products_Select).将其删除,替换为如下的SELECT statement,它返回某个具体产品的所有列.
SELECT ProductID, ProductName, SupplierID, CategoryID,
 QuantityPerUnit, UnitPrice, UnitsInStock, UnitsOnOrder,
 ReorderLevel, Discontinued
FROM Products
WHERE ProductID = @ProductID
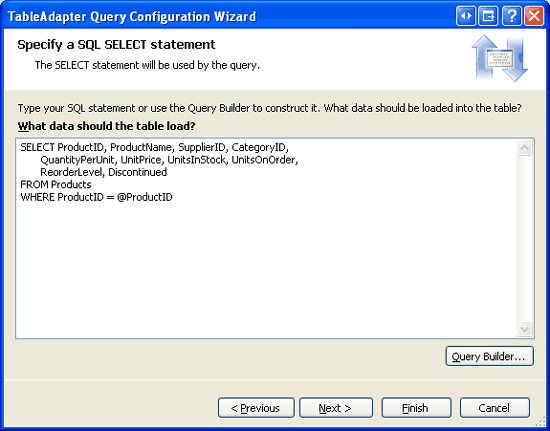
图19:将存储过程的名字替换为一个SELECT查询.
接下来要对创建的存储过程命名,输入Products_SelectByProductID,点Next.
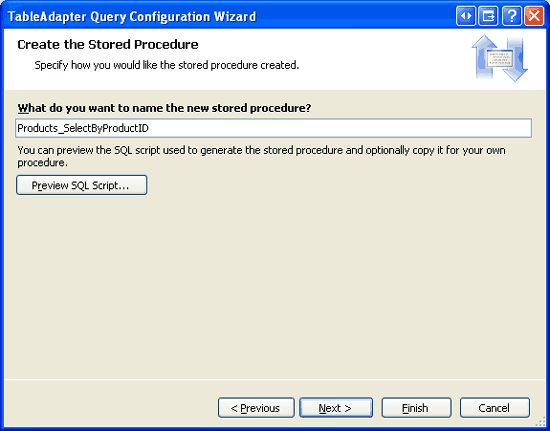
图20:将新存储过程命名为Products_SelectByProductID
最后一步将要我们对自动生成的名字重新命名,并指定是否使用Fill a DataTable模式、是否使用Return a DataTable模式,抑或这2种模式都采用.就本文而言,都选中这2项并将方法重命名为FillByProductID 和 GetProductByProductID.点Next,再点Finish完成设置向导.
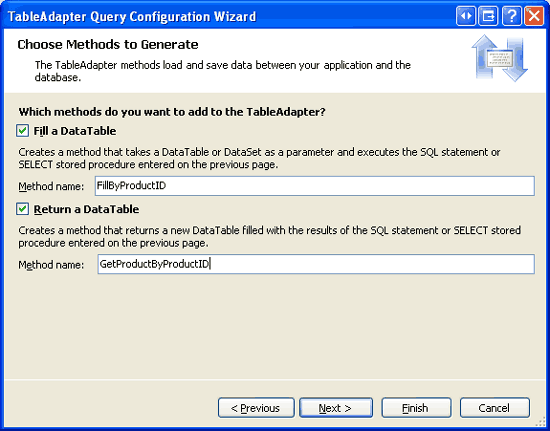
图21:将TableAdapter的方法重命名为FillByProductID 和 GetProductByProductID
完成向导后,TableAdapter将包含一个新的可用方法——GetProductByProductID(productID),当调用该方法时,将执行我们刚刚创建的Products_SelectByProductID存储过程.花点时间在服务器资源管理器里查看该存储过程,点Stored Procedures文件夹,并打开Products_SelectByProductID(如果你没看到它,在Stored Procedures文件夹上右击鼠标,选“刷新”).
请注意,SelectByProductID存储过程将@ProductID作为输入参数,并执行我们在向导里输入的SELECT Statement,如下:
ALTER PROCEDURE dbo.Products_SelectByProductID
(
 @ProductID int
)
AS
 SET NOCOUNT ON;

SELECT ProductID, ProductName, SupplierID, CategoryID,
 QuantityPerUnit, UnitPrice, UnitsInStock, UnitsOnOrder,
 ReorderLevel, Discontinued
FROM Products
WHERE ProductID = @ProductID
第六步:创建一个业务逻辑层类
在我们打算从表现层访问产品前,我们首先需要为新添加的数据集创建一个BLL class,在~/App_Code/BLL文件夹里创建一个ProductsBLLWithSprocs.cs文件,如下:
using System;
using System.Data;
using System.Configuration;
using System.Web;
using System.Web.Security;
using System.Web.UI;
using System.Web.UI.WebControls;
using System.Web.UI.WebControls.WebParts;
using System.Web.UI.HtmlControls;
using NorthwindWithSprocsTableAdapters;

[System.ComponentModel.DataObject]
public class ProductsBLLWithSprocs
{
 private ProductsTableAdapter _productsAdapter = null;
 protected ProductsTableAdapter Adapter
 {
 get
 {
  if (_productsAdapter == null)
  _productsAdapter = new ProductsTableAdapter();

  return _productsAdapter;
 }
 }

 [System.ComponentModel.DataObjectMethodAttribute
 (System.ComponentModel.DataObjectMethodType.Select, true)]
 public NorthwindWithSprocs.ProductsDataTable GetProducts()
 {
 return Adapter.GetProducts();
 }


 [System.ComponentModel.DataObjectMethodAttribute
 (System.ComponentModel.DataObjectMethodType.Select, false)]
 public NorthwindWithSprocs.ProductsDataTable GetProductByProductID(int productID)
 {
 return Adapter.GetProductByProductID(productID);
 }


 [System.ComponentModel.DataObjectMethodAttribute
 (System.ComponentModel.DataObjectMethodType.Insert, true)]
 public bool AddProduct
 (string productName, int? supplierID, int? categoryID,
  string quantityPerUnit, decimal? unitPrice, short? unitsInStock,
  short? unitsOnOrder, short? reorderLevel, bool discontinued)
 {
 // Create a new ProductRow instance
 NorthwindWithSprocs.ProductsDataTable products =
  new NorthwindWithSprocs.ProductsDataTable();
 NorthwindWithSprocs.ProductsRow product = products.NewProductsRow();

 product.ProductName = productName;
 if (supplierID == null)
  product.SetSupplierIDNull();
 else
  product.SupplierID = supplierID.Value;
 if (categoryID == null)
  product.SetCategoryIDNull();
 else
  product.CategoryID = categoryID.Value;
 if (quantityPerUnit == null)
  product.SetQuantityPerUnitNull();
 else
  product.QuantityPerUnit = quantityPerUnit;
 if (unitPrice == null)
  product.SetUnitPriceNull();
 else
  product.UnitPrice = unitPrice.Value;
 if (unitsInStock == null)
  product.SetUnitsInStockNull();
 else
  product.UnitsInStock = unitsInStock.Value;
 if (unitsOnOrder == null)
  product.SetUnitsOnOrderNull();
 else
  product.UnitsOnOrder = unitsOnOrder.Value;
 if (reorderLevel == null)
  product.SetReorderLevelNull();
 else
  product.ReorderLevel = reorderLevel.Value;
 product.Discontinued = discontinued;

 // Add the new product
 products.AddProductsRow(product);
 int rowsAffected = Adapter.Update(products);

 // Return true if precisely one row was inserted, otherwise false
 return rowsAffected == 1;
 }

 [System.ComponentModel.DataObjectMethodAttribute
 (System.ComponentModel.DataObjectMethodType.Update, true)]
 public bool UpdateProduct
 (string productName, int? supplierID, int? categoryID, string quantityPerUnit,
 decimal? unitPrice, short? unitsInStock, short? unitsOnOrder,
 short? reorderLevel, bool discontinued, int productID)
 {
 NorthwindWithSprocs.ProductsDataTable products =
  Adapter.GetProductByProductID(productID);
 if (products.Count == 0)
  // no matching record found, return false
  return false;

 NorthwindWithSprocs.ProductsRow product = products[0];

 product.ProductName = productName;
 if (supplierID == null)
  product.SetSupplierIDNull();
 else
  product.SupplierID = supplierID.Value;
 if (categoryID == null)
  product.SetCategoryIDNull();
 else
  product.CategoryID = categoryID.Value;
 if (quantityPerUnit == null)
  product.SetQuantityPerUnitNull();
 else
  product.QuantityPerUnit = quantityPerUnit;
 if (unitPrice == null)
  product.SetUnitPriceNull();
 else
  product.UnitPrice = unitPrice.Value;
 if (unitsInStock == null)
  product.SetUnitsInStockNull();
 else
  product.UnitsInStock = unitsInStock.Value;
 if (unitsOnOrder == null)
  product.SetUnitsOnOrderNull();
 else
  product.UnitsOnOrder = unitsOnOrder.Value;
 if (reorderLevel == null)
  product.SetReorderLevelNull();
 else
  product.ReorderLevel = reorderLevel.Value;
 product.Discontinued = discontinued;

 // Update the product record
 int rowsAffected = Adapter.Update(product);

 // Return true if precisely one row was updated, otherwise false
 return rowsAffected == 1;
 }

 [System.ComponentModel.DataObjectMethodAttribute
 (System.ComponentModel.DataObjectMethodType.Delete, true)]
 public bool DeleteProduct(int productID)
 {
 int rowsAffected = Adapter.Delete(productID);

 // Return true if precisely one row was deleted, otherwise false
 return rowsAffected == 1;
 }
}
该类和以前章节所创建的ProductsBLL class类差不多,只是它用的是数据集 NorthwindWithSprocs的ProductsTableAdapter 和 ProductsDataTable object对象。与ProductsBLL类使用using NorthwindTableAdapters不同,ProductsBLLWithSprocs类使用的是using NorthwindWithSprocsTableAdapters.同样的,该类的ProductsDataTable和 ProductsRow对象使用的是NorthwindWithSprocs命名空间.我们的ProductsBLLWithSprocs class类提供了2种数据访问方法GetProducts() 和GetProductByProductID().另外,还有添加、更新、删除单个产品的方法.
第七步:在表现层出来数据集NorthwindWithSprocs
此时,我们以及对数据访问层和业务逻辑层做了相关改动,接下来我们要创建一个ASP.NET页面调用BLL的ProductsBLLWithSprocs class类以展示、更新、删除记录.
打开AdvancedDAL文件夹里的NewSprocs.aspx页面,从工具箱拖一个GridView控件到页面,设置其ID为Products. 从GridView的智能标签将其绑定到一个名为ProductsDataSource的ObjectDataSource,设置其调用ProductsBLLWithSprocs类.
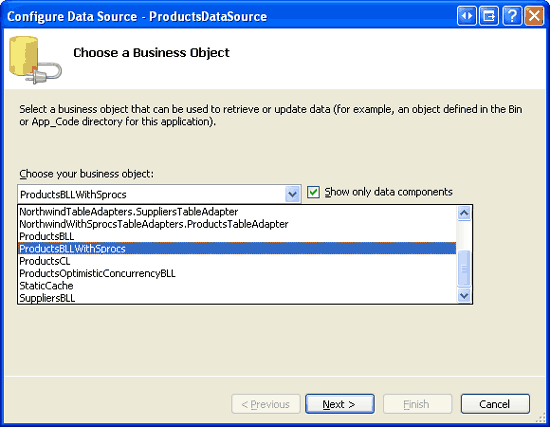
图22:设置ObjectDataSource调用ProductsBLLWithSprocs类
SELECT标签的下拉列表里有2个方法,GetProducts()和GetProductByProductID().由于我们将在GridView里显示所有的产品,所以我们选GetProducts()方法.在UPDATE, INSERT, 和DELETE标签里都只有一个方法,确保选中它们,点Finish按钮。
完成设置后,Visual Studio会向GridView添加BoundFields列以及一个CheckBoxField列, 启用GridView控件的“编辑”和“删除”功能.
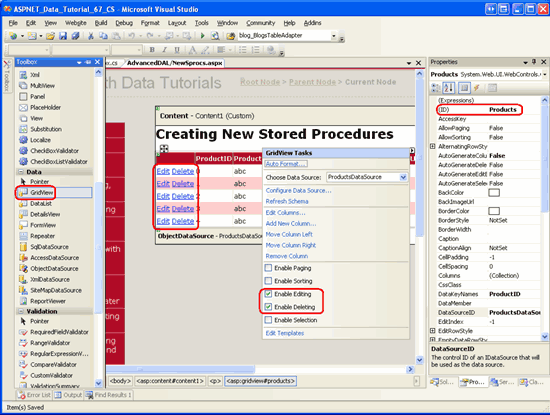
图23:页面包含一个可以分页和排序的GridView控件.
就像在以前的教程里探讨过的一样,完成ObjectDataSource的设置后,Visual Studio 会自动的将OldValuesParameterFormatString属性设置为“original_{0}”. 为使数据修改功能正常工作,要么将该属性删除,要么将其设置为“{0}”.
在我们完成设置、启用“编辑”和“删除”功能、将OldValuesParameterFormatString属性设为其默认值后,页面的声明代码看起来应该和下面的差不多:
asp:GridView ID="Products" runat="server" AutoGenerateColumns="False"
 DataKeyNames="ProductID" DataSourceID="ProductsDataSource">
 Columns>
 asp:CommandField ShowDeleteButton="True" ShowEditButton="True" />
 asp:BoundField DataField="ProductID" HeaderText="ProductID"
  InsertVisible="False" ReadOnly="True"
  SortExpression="ProductID" />
 asp:BoundField DataField="ProductName" HeaderText="ProductName"
  SortExpression="ProductName" />
 asp:BoundField DataField="SupplierID" HeaderText="SupplierID"
  SortExpression="SupplierID" />
 asp:BoundField DataField="CategoryID" HeaderText="CategoryID"
  SortExpression="CategoryID" />
 asp:BoundField DataField="QuantityPerUnit" HeaderText="QuantityPerUnit"
  SortExpression="QuantityPerUnit" />
 asp:BoundField DataField="UnitPrice" HeaderText="UnitPrice"
  SortExpression="UnitPrice" />
 asp:BoundField DataField="UnitsInStock" HeaderText="UnitsInStock"
  SortExpression="UnitsInStock" />
 asp:BoundField DataField="UnitsOnOrder" HeaderText="UnitsOnOrder"
  SortExpression="UnitsOnOrder" />
 asp:BoundField DataField="ReorderLevel" HeaderText="ReorderLevel"
  SortExpression="ReorderLevel" />
 asp:CheckBoxField DataField="Discontinued" HeaderText="Discontinued"
  SortExpression="Discontinued" />
 /Columns>
/asp:GridView>

asp:ObjectDataSource ID="ProductsDataSource" runat="server"
 DeleteMethod="DeleteProduct" InsertMethod="AddProduct"
 SelectMethod="GetProducts" TypeName="ProductsBLLWithSprocs"
 UpdateMethod="UpdateProduct">
 DeleteParameters>
 asp:Parameter Name="productID" Type="Int32" />
 /DeleteParameters>
 UpdateParameters>
 asp:Parameter Name="productName" Type="String" />
 asp:Parameter Name="supplierID" Type="Int32" />
 asp:Parameter Name="categoryID" Type="Int32" />
 asp:Parameter Name="quantityPerUnit" Type="String" />
 asp:Parameter Name="unitPrice" Type="Decimal" />
 asp:Parameter Name="unitsInStock" Type="Int16" />
 asp:Parameter Name="unitsOnOrder" Type="Int16" />
 asp:Parameter Name="reorderLevel" Type="Int16" />
 asp:Parameter Name="discontinued" Type="Boolean" />
 asp:Parameter Name="productID" Type="Int32" />
 /UpdateParameters>
 InsertParameters>
 asp:Parameter Name="productName" Type="String" />
 asp:Parameter Name="supplierID" Type="Int32" />
 asp:Parameter Name="categoryID" Type="Int32" />
 asp:Parameter Name="quantityPerUnit" Type="String" />
 asp:Parameter Name="unitPrice" Type="Decimal" />
 asp:Parameter Name="unitsInStock" Type="Int16" />
 asp:Parameter Name="unitsOnOrder" Type="Int16" />
 asp:Parameter Name="reorderLevel" Type="Int16" />
 asp:Parameter Name="discontinued" Type="Boolean" />
 /InsertParameters>
/asp:ObjectDataSource>
此时,我们可以对GridView控件做些修改,比如在编辑界面里使用确认控件,在CategoryID 和 SupplierID列放置DropDownList控件,当点击Delete按钮时弹出确认框等.由于在以前的教程我们探讨过这些主题,我不打算在此多花笔墨。
不管你做没做这些改进,让我们在浏览器里对页面测试,如图24所示.在GridView控件里每行都可以编辑和删除.
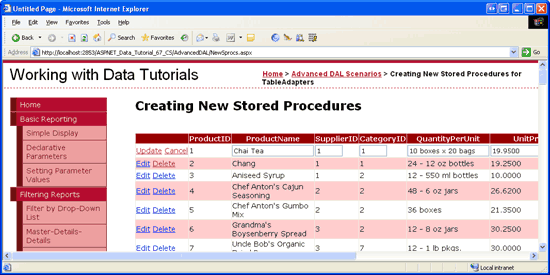
图24:可以通过GridView对产品进行查看、编辑、删除
结语:
类型化数据集里的TableAdapters可以通过ad-hoc SQL statement或存储过程访问数据库里的数据.当处理存储过程时,我们要么使用现有的存储过程,要么使用TableAdapter向导创建一个基于SELECT查询的新的存储过程.在本文,我们考察了如何自动的创建一个存储过程.
虽然自动创建可以节省时间,但是在某些情况下,向导自动创建的存储过程与我们的期望值还是有差距.比如自动创建的Products_Update存储过程,它包含@Original_ProductID 和 @ProductID这2个参数,但@Original_ProductID参数对我们来说是多余的.
在接下来的文章,我们将考察TableAdapter使用现有的存储过程的情况.
祝编程快乐!
作者简介
本系列教程作者 Scott Mitchell,著有六本ASP/ASP.NET方面的书,是4GuysFromRolla.com的创始人,自1998年以来一直应用 微软Web技术。大家可以点击查看全部教程《[翻译]Scott Mitchell 的ASP.NET 2.0数据教程》,希望对大家的学习ASP.NET有所帮助。
您可能感兴趣的文章:- asp.net 结合mysql存储过程进行分页代码
- asp.net安全、实用、简单的大容量存储过程分页
- asp.net 存储过程调用
- asp.net结合aspnetpager使用SQL2005的存储过程分页
- asp.net sql存储过程
- 在ASP.NET中用存储过程执行SQL语句
- asp.net利用存储过程和div+css实现分页(类似于博客园首页分页)
- 在ASP.NET 2.0中操作数据之六十六:在TableAdapters中使用现有的存储过程
- 在ASP.NET 2.0中操作数据之七十二:调试存储过程
- 在ASP.NET 2.0中操作数据之七十三:用Managed Code创建存储过程和用户自定义函数(上部分)