目录
- 一、pip 修改为清华镜像源
- 二、conda 修改为清华镜像源
- 三、homebrew 修改为清华镜像源
一、pip 修改为清华镜像源
① 打开终端,输入 cd ~/.pip/ ;如果没有 .pip 文件夹,就新建: mkdir .pip
② cd .pip
③ vim pip.conf
④ 粘贴如下内容(清华镜像源),粘贴后,按 ESC 退出编辑模式,按 :wq! 进行保存并退出。你可以再打开终端依次输入②和③检查有没有粘贴成功。
[global]
index-url = https://pypi.tuna.tsinghua.edu.cn/simple
[install]
trusted-host=pypi.tuna.tsinghua.edu.cn
【备注】 .pip文件路径为 /Users/你的账户名/ .pip。按shift+command+ . 就能看到这些隐藏文件了,再按一次就能恢复隐藏。
二、conda 修改为清华镜像源
conda config --add channels https://mirrors.tuna.tsinghua.edu.cn/anaconda/pkgs/free
conda config --add channels https://mirrors.tuna.tsinghua.edu.cn/anaconda/pkgs/main
conda config --set show_channel_urls yes
三、homebrew 修改为清华镜像源
① 打开终端,输入下面这一行,会自动生成文件名为 brew_install的文件(文件路径为 /Users/你的账户名/brew_install )
curl -fsSL https://raw.githubusercontent.com/Homebrew/install/master/install >> brew_install
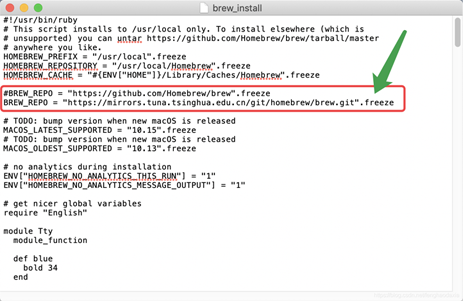
② 右键点击brew_install,打开方式选择 “文本编辑.app”。打开后如图所示,加 # 号注释掉原来的源,再把下面这一行复制粘贴进去即可,保存后关闭文件。
BREW_REPO = "https://mirrors.tuna.tsinghua.edu.cn/git/homebrew/brew.git".freeze

③ 终端输入 /usr/bin/ruby brew_install 耐心等待(也要等很久)
④ 终端输入下面的内容即可完成。(提示:会自动安装 git 工具,等待即可)
cd "$(brew --repo)"
git remote set-url origin https://mirrors.tuna.tsinghua.edu.cn/git/homebrew/brew.git

cd "$(brew --repo)/Library/Taps/homebrew/homebrew-core"
git remote set-url origin https://mirrors.tuna.tsinghua.edu.cn/git/homebrew/homebrew-core.git

brew update
到此这篇关于mac下pip、conda、homebrew修改为清华镜像源的方法的文章就介绍到这了,更多相关pip、conda、homebrew修改为清华镜像源内容请搜索脚本之家以前的文章或继续浏览下面的相关文章希望大家以后多多支持脚本之家!
您可能感兴趣的文章:- pip/anaconda修改镜像源,加快python模块安装速度的操作
- windows环境下修改pip镜像源的方法详解
- windows及linux环境下永久修改pip镜像源的方法
- Mac下更换Homebrew镜像源的实现方法
- 在Anaconda3下使用清华镜像源安装TensorFlow(CPU版)