PyTorch作为一款深度学习框架,已经帮助我们实现了很多很多的功能了,包括数据的读取和转换了,那么这一章节就介绍一下PyTorch内置的数据读取模块吧
import zipfile # 解压
import pandas as pd # 操作数据
import os # 操作文件或文件夹
import cv2 # 图像操作库
import matplotlib.pyplot as plt # 图像展示库
from torch.utils.data import Dataset # PyTorch内置对象
from torchvision import transforms # 图像增广转换库 PyTorch内置
import torch
数据下载到此处
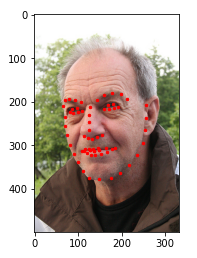
我们先初步编写一个脚本来实现图片的展示
# 解压文件到指定目录
def unzip_file(root_path, filename):
  full_path = os.path.join(root_path, filename)
  file = zipfile.ZipFile(full_path)
  file.extractall(root_path)
unzip_file(root_path, zip_filename)

# 读入csv文件
face_landmarks = pd.read_csv(os.path.join(extract_path, csv_filename))

# pandas读出的数据如想要操作索引 使用iloc
image_name = face_landmarks.iloc[:,0]
landmarks = face_landmarks.iloc[:,1:]

# 展示
def show_face(extract_path, image_file, face_landmark):
  plt.imshow(plt.imread(os.path.join(extract_path, image_file)), cmap='gray')
  point_x = face_landmark.to_numpy()[0::2]
  point_y = face_landmark.to_numpy()[1::2]
  plt.scatter(point_x, point_y, c='r', s=6)

show_face(extract_path, image_name.iloc[1], landmarks.iloc[1])

实现MyDataset
使用内置库是我们的代码更加的规范,并且可读性也大大增加
继承Dataset,需要我们实现的有两个地方:
__len__返回数据的长度,实例化调用len()时返回__getitem__给定数据的索引返回对应索引的数据如:a[0]transform 数据的额外操作时调用class FaceDataset(Dataset):
def __init__(self, extract_path, csv_filename, transform=None):
super(FaceDataset, self).__init__()
self.extract_path = extract_path
self.csv_filename = csv_filename
self.transform = transform
self.face_landmarks = pd.read_csv(os.path.join(extract_path, csv_filename))
def __len__(self):
return len(self.face_landmarks)
def __getitem__(self, idx):
image_name = self.face_landmarks.iloc[idx,0]
landmarks = self.face_landmarks.iloc[idx,1:].astype('float32')
point_x = landmarks.to_numpy()[0::2]
point_y = landmarks.to_numpy()[1::2]
image = plt.imread(os.path.join(self.extract_path, image_name))
sample = {'image':image, 'point_x':point_x, 'point_y':point_y}
if self.transform is not None:
sample = self.transform(sample)
return sample
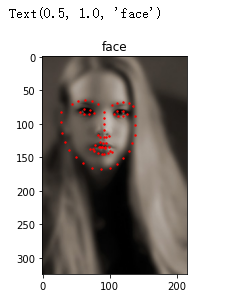
测试功能是否正常
face_dataset = FaceDataset(extract_path, csv_filename)
sample = face_dataset[0]
plt.imshow(sample['image'], cmap='gray')
plt.scatter(sample['point_x'], sample['point_y'], c='r', s=2)
plt.title('face')

内置的在torchvision.transforms模块下,由于我们的数据结构不能满足内置模块的要求,我们就必须自己实现
图片的缩放,由于缩放后人脸的标注位置也应该发生对应的变化,所以要自己实现对应的变化
class Rescale(object):
  def __init__(self, out_size):
    assert isinstance(out_size,tuple) or isinstance(out_size,int), 'out size isinstance int or tuple'
    self.out_size = out_size
  def __call__(self, sample):
    image, point_x, point_y = sample['image'], sample['point_x'], sample['point_y']
    new_h, new_w = self.out_size if isinstance(self.out_size,tuple) else (self.out_size, self.out_size)
    new_image = cv2.resize(image,(new_w, new_h))
    h, w = image.shape[0:2]
    new_y = new_h / h * point_y
    new_x = new_w / w * point_x
    return {'image':new_image, 'point_x':new_x, 'point_y':new_y}
将数据转换为torch认识的数据格式因此,就必须转换为tensor
注意: cv2和matplotlib读出的图片默认的shape为N H W C,而torch默认接受的是N C H W因此使用tanspose转换维度,torch转换多维度使用permute
class ToTensor(object):
  def __call__(self, sample):
    image, point_x, point_y = sample['image'], sample['point_x'], sample['point_y']
    new_image = image.transpose((2,0,1))
    return {'image':torch.from_numpy(new_image), 'point_x':torch.from_numpy(point_x), 'point_y':torch.from_numpy(point_y)}
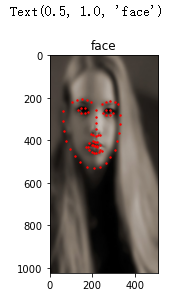
测试
transform = transforms.Compose([Rescale((1024, 512)), ToTensor()])
face_dataset = FaceDataset(extract_path, csv_filename, transform=transform)
sample = face_dataset[0]
plt.imshow(sample['image'].permute((1,2,0)), cmap='gray')
plt.scatter(sample['point_x'], sample['point_y'], c='r', s=2)
plt.title('face')

data_loader = DataLoader(face_dataset, batch_size=4, shuffle=True, num_workers=0)
for i in data_loader:
  print(i['image'].shape)
  break
torch.Size([4, 3, 1024, 512])
注意: windows环境尽量不使用num_workers会发生报错
这节使用内置的数据读取模块,帮助我们规范代码,也帮助我们简化代码,加速读取数据也可以加速训练,数据的增广可以大大的增加我们的训练精度,所以本节也是训练中比较重要环节
到此这篇关于PyTorch数据读取的实现示例的文章就介绍到这了,更多相关PyTorch数据读取内容请搜索脚本之家以前的文章或继续浏览下面的相关文章希望大家以后多多支持脚本之家!