为了研究一下sql自动化检查和分析工具,是否有网上介绍的好用,我在本地进行soar 和 soar-web的安装和使用。
初步的实验结果,总结如下:
1. 安装相对来说较为麻烦,特别是soar-web的依赖包安装,涉及到python pip相关组件的下载安装。
2. 启动soar-web会遇到一些奇怪问题,提示 “ImportError: No module named xxx“ 没有安装,但是通过python -m pip list检查是有安装成功的。
3. soar-web的启动脚本run.sh,不能正常启动;但是使用python./soar-web.py install却可以正常启动。
4. 数据库类型,只支持MySQL一种
后续:
最后,综合感觉,soar-web的功能,距离自动化SQL检查和优化,还有很大空间。接下来,我将继续调研和对比剩下两个工具:see 和 Yearning
1.see 工具
https://github.com/myide/see
2. Yearning 工具
https://github.com/cookieY/Yearning
一 、soar主要步骤,如下:
step 1: 下载安装包
# prepare dir and install
mkdir -p /opt/soft/soar  mkdir -p /opt/install/soar/{log,conf}
wget -O /opt/soft/soar/soar -c https://github.com/XiaoMi/soar/releases/download/0.11.0/soar.linux-amd64
step 2: 复制和安装文件
# install server
mv /opt/soft/soar/soar /opt/install/soar

# 目录介绍:
# 配置文件为yaml格式。一般情况下只需要配置online-dsn, test-dsn, log-output等少数几个参数。即使不创建配置文件SOAR仍然会给出基本的启发式建议。
# 默认文件会按照/etc/soar.yaml, ./etc/soar.yaml, ./soar.yaml顺序加载,
# 找到第一个后不再继续加载后面的配置文件。如需指定其他配置文件可以通过-config参数指定。
# 关于数据库权限online-dsn需要相应库表的SELECT权限,test-dsn需要root最高权限。

# 修改默认配置参数,如下
# 参考
# # 1. 修改soar.conf的基本参数
root >> cat > /opt/install/soar/conf/soar.yaml  EOF
# 线上环境配置
online-dsn:
 addr: CNT7XMYSQLD01:13306
 schema: sakila
 user: root
 password: 1t'sB1g3rt
 disable: false
# 测试环境配置
test-dsn:
 addr: CNT7XMYSQLD01:13307
 schema: test
 user: root
 password: 1t'sB1g3rt
 disable: false
# 是否允许测试环境与线上环境配置相同
allow-online-as-test: true
# 是否清理测试时产生的临时文件
drop-test-temporary: true
# 语法检查小工具
only-syntax-check: false
sampling-statistic-target: 100
sampling: false
# 日志级别,[0:Emergency, 1:Alert, 2:Critical, 3:Error, 4:Warning, 5:Notice, 6:Informational, 7:Debug]
log-level: 7
log-output: ${SOAR_LOG_DIR}/soar.log
# 优化建议输出格式
report-type: markdown
ignore-rules:
- ""
# 黑名单中的 SQL 将不会给评审意见。一行一条 SQL,可以是正则也可以是指纹,填写指纹时注意问号需要加反斜线转义。
blacklist: ${SOAR_CONF_DIR}/soar.blacklist
# 启发式算法相关配置
max-join-table-count: 5
max-group-by-cols-count: 5
max-distinct-count: 5
max-index-cols-count: 5
max-total-rows: 9999999
spaghetti-query-length: 2048
allow-drop-index: false
# EXPLAIN相关配置
explain-sql-report-type: pretty
explain-type: extended
explain-format: traditional
explain-warn-select-type:
- ""
explain-warn-access-type:
- ALL
explain-max-keys: 3
explain-min-keys: 0
explain-max-rows: 10000
explain-warn-extra:
- ""
explain-max-filtered: 100
explain-warn-scalability:
- O(n)
query: ""
list-heuristic-rules: false
list-test-sqls: false
verbose: true
root >> EOF
 step 3: 准备环境变量

# env parameter and path
echo '' >> /etc/profile  \

echo 'SOAR_HOME=/opt/install/soar' >> /etc/profile  \

echo 'SOAR_CONF_DIR=$SOAR_HOME/conf' >> /etc/profile  \

echo 'SOAR_LOG_DIR=$SOAR_HOME/log' >> /etc/profile  \

echo 'PATH=$PATH:$SOAR_HOME' >> /etc/profile  \

source /etc/profile
 step 4: 文件赋予权限

chmod -R 777 $SOAR_HOME/soar
 step 5: 检查soar全局配置生效

# 查看版本
soar -version

# 打印所有的启发式规则
soar -list-heuristic-rules

# 打印支持的报告格式
soar -list-report-types
二 、soar-web主要步骤,如下:
step 1: 安装soar-web的依赖包
# 1.1 安装python3 和 python3-pip 和 gcc (gcc在源代码安装pycryptodome等python组件时候需要)
yum install -y python36 python36-pip gcc

# 检查python3安装结果
python -V
# 检查pip已经安装的python组件
python3 -m pip list
# 卸载pip组件
# python3 -m pip uninstall "packagename"

# 1.2 flask (必须先安装python3)
# 安装教程:https://www.cnblogs.com/wobeinianqing/p/7650498.html
# yum install -y flask
python3 -m pip install flask


# 1.3 安装 pymysql (必须先安装python3)
# 安装教程:https://blog.csdn.net/qq_37788558/article/details/73716002
# 安装教程:https://github.com/PyMySQL/PyMySQL
python3 -m pip install PyMySQL


# 1.4 安装 pycryptodome (必须先安装python3)
python3 -m pip install pycryptodome
# 如果pip下载速度慢,可以用如下命令
#### 或 安装方式2,如下
python3 -m pip install /opt/soft/soar/pycryptodome-3.9.6.tar.gz
#### 或 安装方式3,如下
# 格式 = python3 -m pip install https://pypi.tuna.tsinghua.edu.cn/simple/simple/{包名}
# 格式 = python3 -m pip install https://pypi.doubanio.com/simple/{包名}
python3 -m pip install https://pypi.tuna.tsinghua.edu.cn/simple/pycryptodome-3.9.6.tar.gz
step 2: 安装soar-web

# 2.1 下载soar-web的源代码
wget -O /opt/soft/soar/soar-web-master.zip -c https://codeload.github.com/xiyangxixian/soar-web/zip/master
yum install -y unzip
unzip /opt/soft/soar/soar-web-master.zip -d /opt/soft/soar/

# 2.2 安装soar-web
mkdir -p /opt/install/soar-web  \

mv /opt/soft/soar/soar-web-master/* /opt/install/soar-web
# 运行soar-web
chmod -R 777 /opt/install/soar-web/run.sh
bash /opt/install/soar-web/run.sh

# 2.3 或者如下方法启动soar-web
cd /opt/install/soar-web/
python3 ./soar-web.py install
step 3:检查端口,如下
netstat -nltp | grep 5077

step 4:客户端,访问URL,如下:
地址 = http://{server-ip}:5077

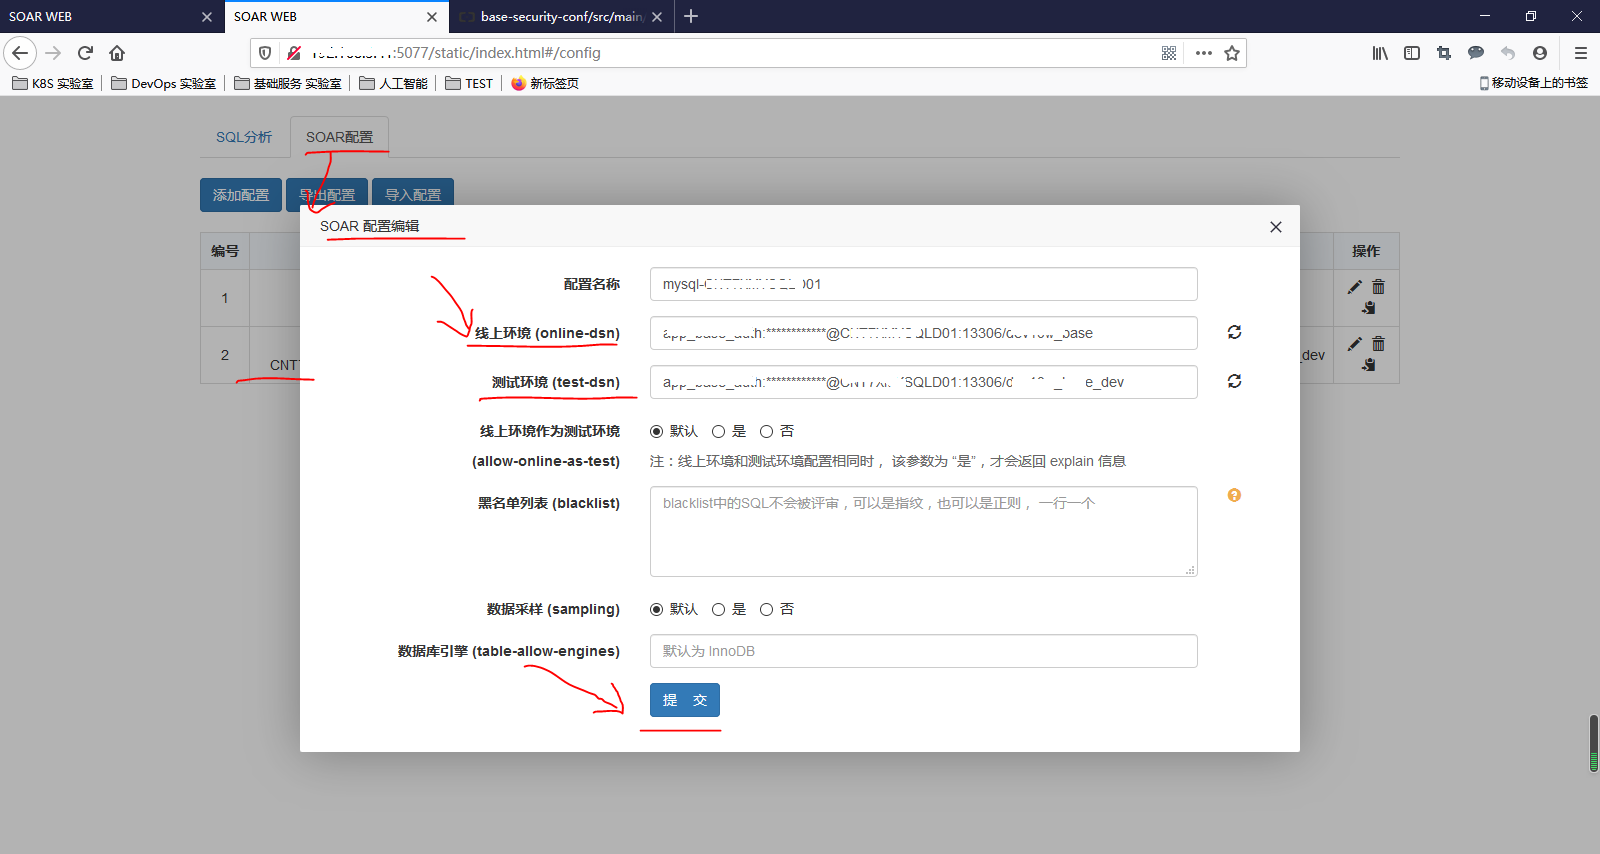
step 5: 配置数据库源
线上环境参数 = 数据库账号:数据库密码@数据库hostname:数据库hostport/数据库实例名称

step 6:测试和使用SQL检查
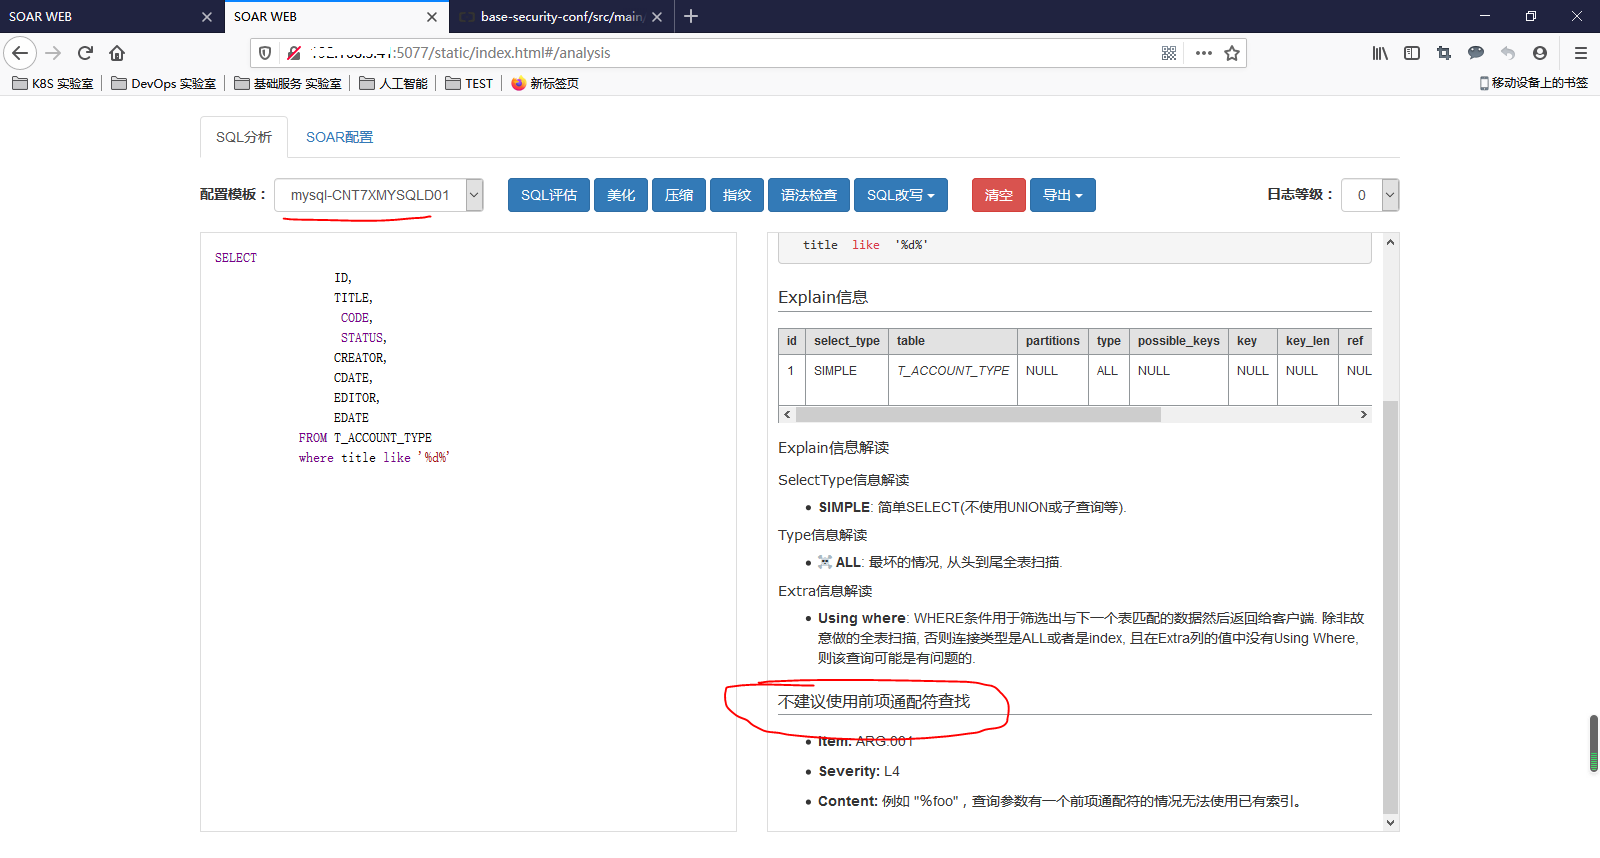
首先,选择配置参数“mysql-CNT7XMYSQLD01”,然后输入要检查的SQL,如下图:得到检查SQL的结果

总结
到此这篇关于sql自动化检查和分析工具 之soar和soar-web 安装和使用体验的文章就介绍到这了,更多相关sql自动化检查和分析工具内容请搜索脚本之家以前的文章或继续浏览下面的相关文章希望大家以后多多支持脚本之家!
您可能感兴趣的文章:- MySQL结合使用数据库分析工具SchemaSpy的方法
- MySQL性能分析工具profile使用教程
- mysqlsla慢查询分析工具使用笔记
- Mysql自带profiling性能分析工具使用分享
- 五款常用mysql slow log分析工具的比较分析